-
If you enjoy the forum please consider supporting it by signing up for a NES Membership The benefits pay for the membership many times over.
You are using an out of date browser. It may not display this or other websites correctly.
You should upgrade or use an alternative browser.
You should upgrade or use an alternative browser.
1903 Drill Rifle Re-Activation
- Thread starter BigGreen2000
- Start date
Yup I've done it and yes it can be safe depending on how badly it was welded. And it should not be a 'low number' 1903 either.
You can't recover the bolt if it was welded over the firing pin hole, so don't bother with that.
Got pics?
You can't recover the bolt if it was welded over the firing pin hole, so don't bother with that.
Got pics?
DP rifles often were considered beyond repair or factory rejects and that's why they wound up as drill purpose rifles. Is it possible? Yes. Is it a good idea, probably not without thoroughly understanding why the rifle was DP'd.
Many companies and gunsmiths have resurrected drill rifles over the past many decades.DP rifles often were considered beyond repair or factory rejects and that's why they wound up as drill purpose rifles. Is it possible? Yes. Is it a good idea, probably not without thoroughly understanding why the rifle was DP'd.
It is not something an amateur should do. A bolt under pressure on a receiver where some armorer or factory inspector noticed heat treatment was worn on substandard is a recipe for a deadly kaboom or locking lugs getting sheared off.Many companies and gunsmiths have resurrected drill rifles over the past many decades.
BigGreen2000
NES Member
If you are asking this (which you are), then you’d better not do it. Leave it to someone who can answer the question for themself.
So I actually have some machining experience, and I can work a Bridgeport. I have some experience working on Mausers, and I machined my own receiver holding block, action wrench, and barrel vise. I slug bores, reload ammo, etc. My hangup on the 1903A3 was the barrel/ receiver tack weld. After lots of research, seems to be a non-issue.
This depends on the weld and how well they welded it and where.So I actually have some machining experience, and I can work a Bridgeport. I have some experience working on Mausers, and I machined my own receiver holding block, action wrench, and barrel vise. I slug bores, reload ammo, etc. My hangup on the 1903A3 was the barrel/ receiver tack weld. After lots of research, seems to be a non-issue.
Might be worth a pic or 2 here and on cmp forums.
Kitchen Table Gun Smith had a write up about drill rifle recovery.
Not sure if these services are readily available but getting it magnafluxed or Xrayed for cracks might help.
BigGreen2000
NES Member
Love MilSurps. Yeah, for the longest time I was like “why do I want a 1903, it’s just a Mauser clone.” Rear leaf sight and front blade, already have a few. Didn’t realize until a few years ago the 1903A3 existed: Mauser clone with Garand-style click adjustable rear sights. Amazing, since I am already into Garands!

BigGreen2000
NES Member
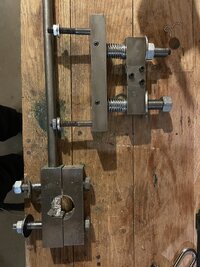
Nice job! I can get the bolt-cutoff weld easily removed, as well as the barrel/receiver weld. Getting the barrels off has been difficult. I have a nice action wrench/barrel vice that I machined myself, but the barrel keeps slipping. My plan is to next hook it up to a hydraulic press. I don't have access to a purpose-built press, but I do have access to a Bridgeport mill. I thought I might mount the barrel vice to the mill table, then put the hydraulic jack between the top of the barrel vise and the underside of the head, where the quill would usually go. I've already made a relief cut in the barrel in front of the receiver, soaked the threads in Kroil, etc. . .
Not exactly- you move the rear peep manually. 03A3 sights have a spring clip that is supposed to hold positions at the various detents. Holding position is often iffy, so most of us who shoot the CMP vintage matches will stake them in place at 200 yards for a typical match load.Love MilSurps. Yeah, for the longest time I was like “why do I want a 1903, it’s just a Mauser clone.” Rear leaf sight and front blade, already have a few. Didn’t realize until a few years ago the 1903A3 existed: Mauser clone with Garand-style click adjustable rear sights. Amazing, since I am already into Garands!
I would not use the press Idea in your mill. Since you already cut into the barrel , make some flats on the barrel. Make sure you bench is very stable. If your bench is moving around your loosing energy.Nice job! I can get the bolt-cutoff weld easily removed, as well as the barrel/receiver weld. Getting the barrels off has been difficult. I have a nice action wrench/barrel vice that I machined myself, but the barrel keeps slipping. My plan is to next hook it up to a hydraulic press. I don't have access to a purpose-built press, but I do have access to a Bridgeport mill. I thought I might mount the barrel vice to the mill table, then put the hydraulic jack between the top of the barrel vise and the underside of the head, where the quill would usually go. I've already made a relief cut in the barrel in front of the receiver, soaked the threads in Kroil, etc. . .
Mount your barrel vise to the Right side of the bench.
I would also make sure there is no other welding, did they weld a slug into the chamber?
Is the relief cut deep enough?


BigGreen2000
NES Member
There is a slug in the chamber, but the barrel has a “v” cut forward of the receiver ring that penetrates all the way into the barrel tube, and this is where they welded the plug. Why two handles on your action wrench?
The action wrench handle is welded on and there is a large nut welded to the action wrench for attaching the torque wrench.There is a slug in the chamber, but the barrel has a “v” cut forward of the receiver ring that penetrates all the way into the barrel tube, and this is where they welded the plug. Why two handles on your action wrench?
Here , this was a very stubborn 1917 barrel. I had to relieve the barrel shoulder and it too 3’ cheater pipe to break it free. Once free it spun nice
View: https://youtube.com/shorts/TZaBovJjkSw?feature=share
Last edited:
The heat they use on those welds can be extremely hot. And can distort just about anything and everything.There is a slug in the chamber, but the barrel has a “v” cut forward of the receiver ring that penetrates all the way into the barrel tube, and this is where they welded the plug. Why two handles on your action wrench?
Personally I would cut flats on the barrel shank and set up your barrel vise with flat bushings. Relief cut the should a bit more and make sure your past the face of the receiver.
BigGreen2000
NES Member
Yep, looks like milling flats on the barrel is the way to go. By the way, I had the CMP re-barrel and re-park my 1917 Enfield. I kept bugging them: “is there any crack in the receiver ring?!” Those barrels are on tight!!
BigGreen2000
NES Member
The heat they use on those welds can be extremely hot. And can distort just about anything and everything.
Personally I would cut flats on the barrel shank and set up your barrel vise with flat bushings. Relief cut the should a bit more and make sure your past the face of the receiver.
OK, so I milled flats on the barrel, started twisting: and the barrel itself started twisting, but the receiver would not break loose! Not sure what to do now other then put it in a lathe and cut a deeper relief cut
How about some pictures?OK, so I milled flats on the barrel, started twisting: and the barrel itself started twisting, but the receiver would not break loose! Not sure what to do now other then put it in a lathe and cut a deeper relief cut
Of the welds, slug, relief cut, what are you using for barrel and action tools?
If you have a lathe tou can bore out the barrel to just expose the action threads and the remaining threads should darn near fall out.
BigGreen2000
NES Member
BigGreen2000
NES Member
This pics are from two different receivers, but you get the idea. Relief cut is maybe 2 mm deep
Attachments
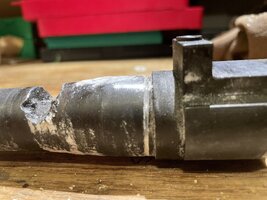

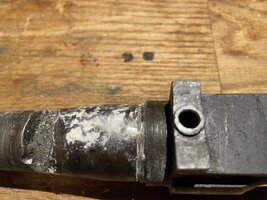
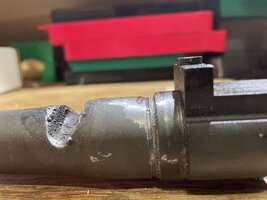
You need a deeper relief cut. You need to get past or close to the end of where the barrel should and receiver face contact each other.This pics are from two different receivers, but you get the idea. Relief cut is maybe 2 mm deep
A lathe is not needed. I have done all mine with a dremel and a thin metal cutting blade and just take your time.
My thoughts are after these are welded , condensation sets in deep along with these demilled guns not being taken care of as well?
The relief cut does not need to be right against the receiver. You can leave a thin sliver you just need to get deep enough to relieve the pressure/tension from shoulder to face and then your just fighting the threads.
A trick I use on stubborn threads when the integrity of the alloy is a issue is to heat the junk end which is the barrel , just a bit few hundred degrees. Then drip water on it to cool , the expansion and contraction can break the surface tension ,
Had to do that with a wheel bearing today, steel bearing “cold welded” from galvanic corrosion
Heat the steel up and douse with cold water , eventually the corrosion will break loose and the parts will separate.
It does not show up well in the video but the barrel shank had a very thin sliver that was left between the receiver and where I cut it.
Last edited:
no , theres really no need to IMHO, If so your going to need some tools.Sounds like I need a lathe! Should I also face the front of the receiver once the barrel is off?
RECEIVER FACING MANDREL
theres also receiver face cutting tools.
Last edited:
finally got to look at this on the PC with a big screen. Those relief cuts are to shallow and could be much closer to the receiver.This pics are from two different receivers, but you get the idea. Relief cut is maybe 2 mm deep
Do you have a new barrel handy?Thank you!
Measure the barrel “shank” to where the threads are. Thats about the depth of relief cut.
Share:
Similar threads
- Replies
- 15
- Views
- 528