one-eyed Jack
Manufacturer
Hi kids,
I've submitted this to Small Arms Review for possible publication. Thought that I might share it with NES also. Don't try this at home unless you are properly licensed!
Jack
July 10, 2008
It was with great interest that I read Capt. Monty Mendenhall’s article on a prototype suppressed shotgun (SAR Aug.2008).
In 1991, I designed, built and registered a suppressed shotgun using a 20 gauge H&R single barrel, 28”, as a starting point. Very little, if any, information on this type of firearm was available at that time, so I thought that it may be a fun project. Being pleased with the end result, I thought that now, although 17 years later, I would like to share my findings with the S.A.R. readers.
My design criteria were as follows:
1. Significant sound reduction
2. Pleasant to shoot without hearing protection
3. No baffles, integral suppression only
4. Ease of manufacture, assembly and maintenance
5. A ported barrel surrounded by a tube to allow for the installation of material to cool the gasses behind the shot charge
6. The ability to increase the size and quantity of the port holes and to be able to experiment with various types of packing materials
7. A finished product that was decent in appearance and not too heavy or bulky
8. To be able to be built using only a milling machine and engine lathe and hand tools
9. Using only readily available materials
Now we begin:
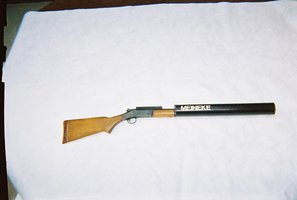
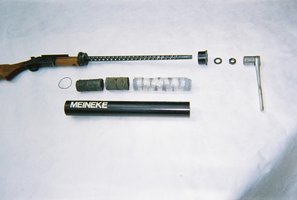
First I shortened the wood fore end of the gun to 4 ½”. This would allow the ports to start at 9 ½” from the breech end of the barrel. I acquired a length of 6061 aluminum tubing, 2 ½” o.d. with a 1/8” wall, some 2 ½” round aluminum bar stock and went to work. First, I machined the rear end cap from aluminum so that it was bored to a slight taper to give me a drive fit onto the barrel’s taper. The o.d. was turned for a slip-fit into the tube. I left a flange on the cap to stop against the tube, knurled this flange for appearance and provided for a rubber “o” ring seal here to prevent leakage of gasses, which has not been an issue.
The front cap was also machined from aluminum for a slip fit onto the barrel and into the tube. This also has a knurled flange. The front is counter-bored to accept a Delrin washer and a ¾ - 10 hex jam nut to keep everything flush at the front end.
The muzzle end of the barrel was just the right diameter to thread ¾ - 10.
With everything assembled, I had 17 ½” of barrel available to drill my ports. I started with 88 ¼” diameter holes in a staggered pattern, ¾” on center.
The free volume in the tube calculated out to be 60 cubic inches, and I decided to fill it all with packing of some sort. The first 4 ½” (at the hot end) of the barrel was wound with a fine stainless steel screening material. This cylinder of screening was held together with some copper wire to maintain its shape. The rest of the barrel was wrapped with aluminum mesh and screening in a similar fashion.
Let’s Try It:
I acquired some 20 gauge birdshot and went to the range. In comparing the suppressor to another 20 gauge gun, it was obvious there was a significant sound reduction and I decided to enlarge the holes.
Throughout the subsequent testing, I was finding out that increasing the hole size continued to reduce the sound levels, and I eventually ended up with 88 holes, .42” diameter, which is as far as I dared to go without compromising the strength of the barrel. This calculates out to over 12 square inches of porting.
Results?:
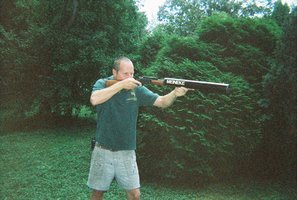
The gun is not “silent”, of course, but you could call it darn quiet for a shotgun. It is pleasant to shoot without ear protection and always amazes onlookers at the range. It seems to be able to digest whatever I feed it, including slugs, and nothing appears to come out supersonic. Recoil is almost non-existent.
So, I decided to upgrade its appearance. All the aluminum parts were black gloss anodized, a white bead was added to the front of the tube to serve as a sight, and the “Meineke” label was added just for grins.
Maintenance:
I just take the suppressor apart now and again and clean up the innards. Sometimes I run it wet, which also reduces the sound level (1/2 cup of “muffler milk”, consisting of 10% water soluble cutting oil and the rest tap water). After I run it wet, I remove the screening to let it dry. Initially, due to the size of the ports, I thought that I would find some pellets in the tube. This turns out not to be the case.
Conclusion:
This shotgun really has no practical use. I built it and shoot it just for personal amusement. It draws a crowd at the range.
Comments?
I’m calling the project complete at this point since I’ve reached the end of my shotgun suppressor knowledge string. I would certainly welcome any and all comments or suggestions which could improve the design. Thanks for looking-
Jack Lorenz (jack@clpworldhq.com)
I've submitted this to Small Arms Review for possible publication. Thought that I might share it with NES also. Don't try this at home unless you are properly licensed!
Jack
July 10, 2008
It was with great interest that I read Capt. Monty Mendenhall’s article on a prototype suppressed shotgun (SAR Aug.2008).
In 1991, I designed, built and registered a suppressed shotgun using a 20 gauge H&R single barrel, 28”, as a starting point. Very little, if any, information on this type of firearm was available at that time, so I thought that it may be a fun project. Being pleased with the end result, I thought that now, although 17 years later, I would like to share my findings with the S.A.R. readers.
My design criteria were as follows:
1. Significant sound reduction
2. Pleasant to shoot without hearing protection
3. No baffles, integral suppression only
4. Ease of manufacture, assembly and maintenance
5. A ported barrel surrounded by a tube to allow for the installation of material to cool the gasses behind the shot charge
6. The ability to increase the size and quantity of the port holes and to be able to experiment with various types of packing materials
7. A finished product that was decent in appearance and not too heavy or bulky
8. To be able to be built using only a milling machine and engine lathe and hand tools
9. Using only readily available materials
Now we begin:
First I shortened the wood fore end of the gun to 4 ½”. This would allow the ports to start at 9 ½” from the breech end of the barrel. I acquired a length of 6061 aluminum tubing, 2 ½” o.d. with a 1/8” wall, some 2 ½” round aluminum bar stock and went to work. First, I machined the rear end cap from aluminum so that it was bored to a slight taper to give me a drive fit onto the barrel’s taper. The o.d. was turned for a slip-fit into the tube. I left a flange on the cap to stop against the tube, knurled this flange for appearance and provided for a rubber “o” ring seal here to prevent leakage of gasses, which has not been an issue.
The front cap was also machined from aluminum for a slip fit onto the barrel and into the tube. This also has a knurled flange. The front is counter-bored to accept a Delrin washer and a ¾ - 10 hex jam nut to keep everything flush at the front end.
The muzzle end of the barrel was just the right diameter to thread ¾ - 10.
With everything assembled, I had 17 ½” of barrel available to drill my ports. I started with 88 ¼” diameter holes in a staggered pattern, ¾” on center.
The free volume in the tube calculated out to be 60 cubic inches, and I decided to fill it all with packing of some sort. The first 4 ½” (at the hot end) of the barrel was wound with a fine stainless steel screening material. This cylinder of screening was held together with some copper wire to maintain its shape. The rest of the barrel was wrapped with aluminum mesh and screening in a similar fashion.
Let’s Try It:
I acquired some 20 gauge birdshot and went to the range. In comparing the suppressor to another 20 gauge gun, it was obvious there was a significant sound reduction and I decided to enlarge the holes.
Throughout the subsequent testing, I was finding out that increasing the hole size continued to reduce the sound levels, and I eventually ended up with 88 holes, .42” diameter, which is as far as I dared to go without compromising the strength of the barrel. This calculates out to over 12 square inches of porting.
Results?:
The gun is not “silent”, of course, but you could call it darn quiet for a shotgun. It is pleasant to shoot without ear protection and always amazes onlookers at the range. It seems to be able to digest whatever I feed it, including slugs, and nothing appears to come out supersonic. Recoil is almost non-existent.
So, I decided to upgrade its appearance. All the aluminum parts were black gloss anodized, a white bead was added to the front of the tube to serve as a sight, and the “Meineke” label was added just for grins.
Maintenance:
I just take the suppressor apart now and again and clean up the innards. Sometimes I run it wet, which also reduces the sound level (1/2 cup of “muffler milk”, consisting of 10% water soluble cutting oil and the rest tap water). After I run it wet, I remove the screening to let it dry. Initially, due to the size of the ports, I thought that I would find some pellets in the tube. This turns out not to be the case.
Conclusion:
This shotgun really has no practical use. I built it and shoot it just for personal amusement. It draws a crowd at the range.
Comments?
I’m calling the project complete at this point since I’ve reached the end of my shotgun suppressor knowledge string. I would certainly welcome any and all comments or suggestions which could improve the design. Thanks for looking-
Jack Lorenz (jack@clpworldhq.com)
Attachments
Last edited:
![[cheers]](/xen/styles/default/xenforo/smilies.vb/018.gif "Cheers [cheers]")
![[grin]](/xen/styles/default/xenforo/smilies.vb/041.gif "Grin [grin]") Jack.
Jack.![[smile]](/xen/styles/default/xenforo/smilies.vb/001.gif "Smile [smile]")
![[sad]](/xen/styles/default/xenforo/smilies.vb/004.gif "Sad [sad]") ) and I don't remember it being as fast as yours. It was a fire-breather, but yours defines bullet-hose - I was stunned at not only how fast it was, but how nicely the can kept it controllable. Are you running a BlackJack buffer in that puppy? Thanks again for helping me re-spark very old and very fond memories of my Powder Springs....
) and I don't remember it being as fast as yours. It was a fire-breather, but yours defines bullet-hose - I was stunned at not only how fast it was, but how nicely the can kept it controllable. Are you running a BlackJack buffer in that puppy? Thanks again for helping me re-spark very old and very fond memories of my Powder Springs....![[shocked]](/xen/styles/default/xenforo/smilies.vb/007.gif "Shocked [shocked]") Anyway, thanks again and you're right - I do miss it. I remember the cheap Reisings as well - in fact, I had the choice between a $375.00 MAC and a $440.00 Reising. There was also a $900.00 MP5 and I seem to remember a $1200.00 Thompson M1, but I didn't want to spend the cash and figured I'd just buy one down the road...
Anyway, thanks again and you're right - I do miss it. I remember the cheap Reisings as well - in fact, I had the choice between a $375.00 MAC and a $440.00 Reising. There was also a $900.00 MP5 and I seem to remember a $1200.00 Thompson M1, but I didn't want to spend the cash and figured I'd just buy one down the road...