strangenh
NES Member
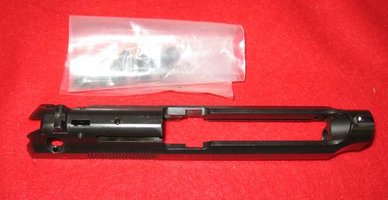
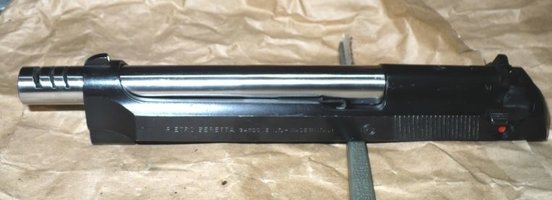
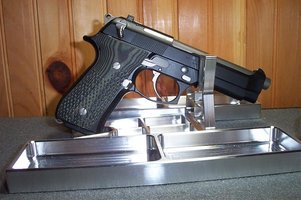
Today, I took a really filthy, stripped 92 slide and a pile of parts and turned it into a working 92FS upper - thanks to a ProMag Brass Hammer and Punch set and Army publication TM 9-1005-317-23&P (aka Navy SW 370-AA-MMO-010/9mm, aka Air Force TO 11W3-3-5-4, aka Marine Corps TM 1005-23&P/2, aka Coast Guard COMDTINST M8370.7).


The bare slide looked pretty good but was utterly filthy; it took Gun Scrubber, my usual CLP (Bullfrog), KG-1 carbon remover, and M-Pro 7 on 30 or so patches with toothbrushing to get it to something like clean. Blank gunk, green gunk, and bits of metal (mostly teeny slivers of brass). When that was done, the slide looked basically unused on the inside, with a few scuffs on the outside. My guess is it was carried, shot a good deal, and more or less never really cleaned.
Then the parts assembly began.
Beretta armorers - how the heck can you stand doing a full disassembly/reassembly on these? WOW. Just WOW.
It starts easy - insert the firing pin spring and pin, push in and use the firing pin block, from the outside of the frame, to hold it in.
Then it starts to get crazy. Insert the extractor spring and extractor; push the extractor back and in simultaneously so it's flush with the slide; with your third hand, insert the extractor pin until the extractor's held fast. You may need a punch; if so, use your fourth and fifth hands. Then, relax, and tap in the extractor pin the rest of the way.
Now you can also pull out the firing pin block, since it's on the wrong side anyhow.
Next, take the left side safety and put the firing pin striker into it. No springs, so that's easy. Then squint at the three small springs and figure out which one is a little bigger. That's the safety detent spring. Take the trigger bar detent and its (smaller) spring and put them into the trigger bar detent retaining hole. Take the safety detent and its (larger) spring and put them into their hole. Push the left safety into the slide, slightly clockwise of where it's suppose to stop when the safety is off. That was easy, especially if you have mildly nearsighted 20/40 vision like I do.
Now the fun begins. Take a punch and push down the trigger bar detent until it's down in the hole and push the left safety in until it is over that hole. Don't forget to clear the room of anything that the trigger bar spring and detent can hide under each time they go flying. Eventually, the safety is over the compressed trigger bar detent/spring and you're out only $12 or so on spares.
Now, repeat the process but with the safety detent and spring until you can push the left safety all the way in. Only about $9 in spare parts, usually. Rotate the safety down to safe.
Insert the safety wing (the right side safety) until its microscopic holes line up with those in the safety. Use a 1/16" punch to verify, even though the holes are more like 1/18". Use a punch to tap in the two tiny spring pins until flush, ignoring that you're punching into a curved surface on an object that likes to skitter around.
Whew!
Now flip the slide upside down and set the firing pin block spring into its hole and insert the firing pin block properly this time. Hold the block down against the spring so it is slightly beyond flush while you use a hammer and punch with your other two hands to tap the firing pin block spring all 7 feet of its length across the frame until slightly below flush.
You're done!


That took me about 2 hours total. It appears to work. Anyone have any LIII armor and faceplate I could borrow before I actually try this guy out with live ammo?![Wave [wave] [wave]](/xen/styles/default/xenforo/smilies.vb/011.gif)
![Wink [wink] [wink]](/xen/styles/default/xenforo/smilies.vb/002.gif)
![Wink [wink] [wink]](/xen/styles/default/xenforo/smilies.vb/002.gif)


The bare slide looked pretty good but was utterly filthy; it took Gun Scrubber, my usual CLP (Bullfrog), KG-1 carbon remover, and M-Pro 7 on 30 or so patches with toothbrushing to get it to something like clean. Blank gunk, green gunk, and bits of metal (mostly teeny slivers of brass). When that was done, the slide looked basically unused on the inside, with a few scuffs on the outside. My guess is it was carried, shot a good deal, and more or less never really cleaned.
Then the parts assembly began.
Beretta armorers - how the heck can you stand doing a full disassembly/reassembly on these? WOW. Just WOW.
It starts easy - insert the firing pin spring and pin, push in and use the firing pin block, from the outside of the frame, to hold it in.
Then it starts to get crazy. Insert the extractor spring and extractor; push the extractor back and in simultaneously so it's flush with the slide; with your third hand, insert the extractor pin until the extractor's held fast. You may need a punch; if so, use your fourth and fifth hands. Then, relax, and tap in the extractor pin the rest of the way.
Now you can also pull out the firing pin block, since it's on the wrong side anyhow.
Next, take the left side safety and put the firing pin striker into it. No springs, so that's easy. Then squint at the three small springs and figure out which one is a little bigger. That's the safety detent spring. Take the trigger bar detent and its (smaller) spring and put them into the trigger bar detent retaining hole. Take the safety detent and its (larger) spring and put them into their hole. Push the left safety into the slide, slightly clockwise of where it's suppose to stop when the safety is off. That was easy, especially if you have mildly nearsighted 20/40 vision like I do.
Now the fun begins. Take a punch and push down the trigger bar detent until it's down in the hole and push the left safety in until it is over that hole. Don't forget to clear the room of anything that the trigger bar spring and detent can hide under each time they go flying. Eventually, the safety is over the compressed trigger bar detent/spring and you're out only $12 or so on spares.
Now, repeat the process but with the safety detent and spring until you can push the left safety all the way in. Only about $9 in spare parts, usually. Rotate the safety down to safe.
Insert the safety wing (the right side safety) until its microscopic holes line up with those in the safety. Use a 1/16" punch to verify, even though the holes are more like 1/18". Use a punch to tap in the two tiny spring pins until flush, ignoring that you're punching into a curved surface on an object that likes to skitter around.
Whew!
Now flip the slide upside down and set the firing pin block spring into its hole and insert the firing pin block properly this time. Hold the block down against the spring so it is slightly beyond flush while you use a hammer and punch with your other two hands to tap the firing pin block spring all 7 feet of its length across the frame until slightly below flush.
You're done!


That took me about 2 hours total. It appears to work. Anyone have any LIII armor and faceplate I could borrow before I actually try this guy out with live ammo?
![Wave [wave] [wave]](/xen/styles/default/xenforo/smilies.vb/011.gif)
![Wink [wink] [wink]](/xen/styles/default/xenforo/smilies.vb/002.gif)
![Wink [wink] [wink]](/xen/styles/default/xenforo/smilies.vb/002.gif)
Last edited:

![This Thread Is Worthless Without Pics [pics] [pics]](/xen/styles/default/xenforo/smilies.vb/this_thread_is_worthless_without_pics.gif)
![Smile [smile] [smile]](/xen/styles/default/xenforo/smilies.vb/001.gif) Turns out I have some "before" pics.
Turns out I have some "before" pics.