Tactical Build on a Ruger SR1911

Joined
May 18, 2013
Messages
45
Likes
8
Feedback: 0 / 0 / 0
Something kind of extreme, but it ended up exactly how I wanted it.

DSC02142_zps146299ed.jpg

DSC02122_zpsb3a534b5.jpg

DSC02143_zps0244a30e.jpg

DSC02152_zps663be017.jpg

DSC02139_zps1f414032.jpg

DSC02140_zps1c75fbdc.jpg

DSC02130_zps5938b63a.jpg

DSC02125_zpsdd36e948.jpg


I'm a Machinist, so I had the pleasure of doing all the work myself.

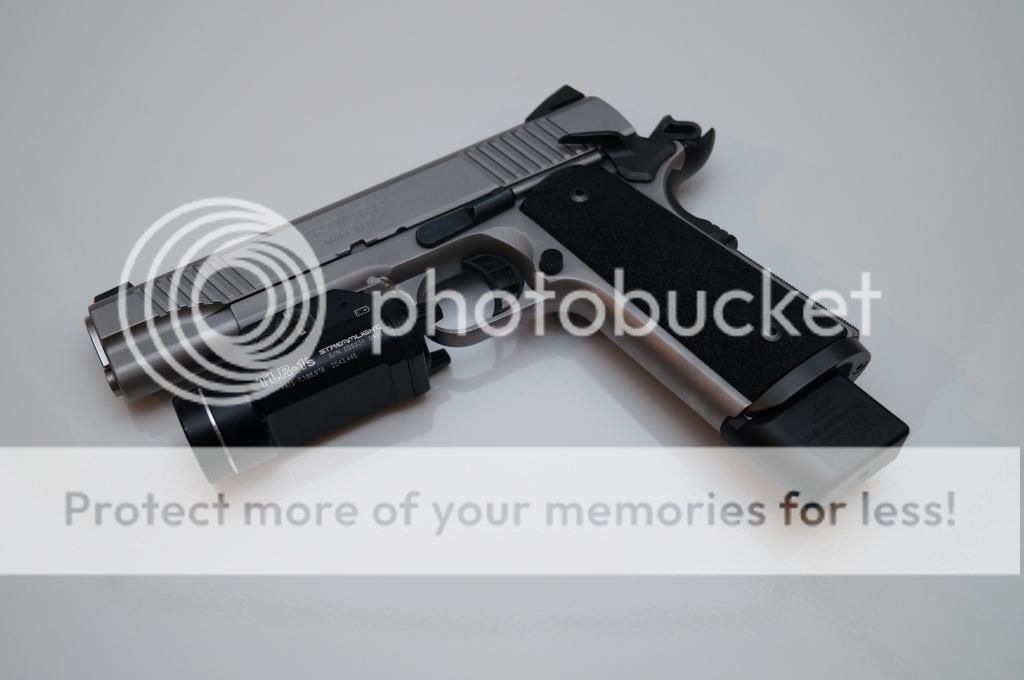
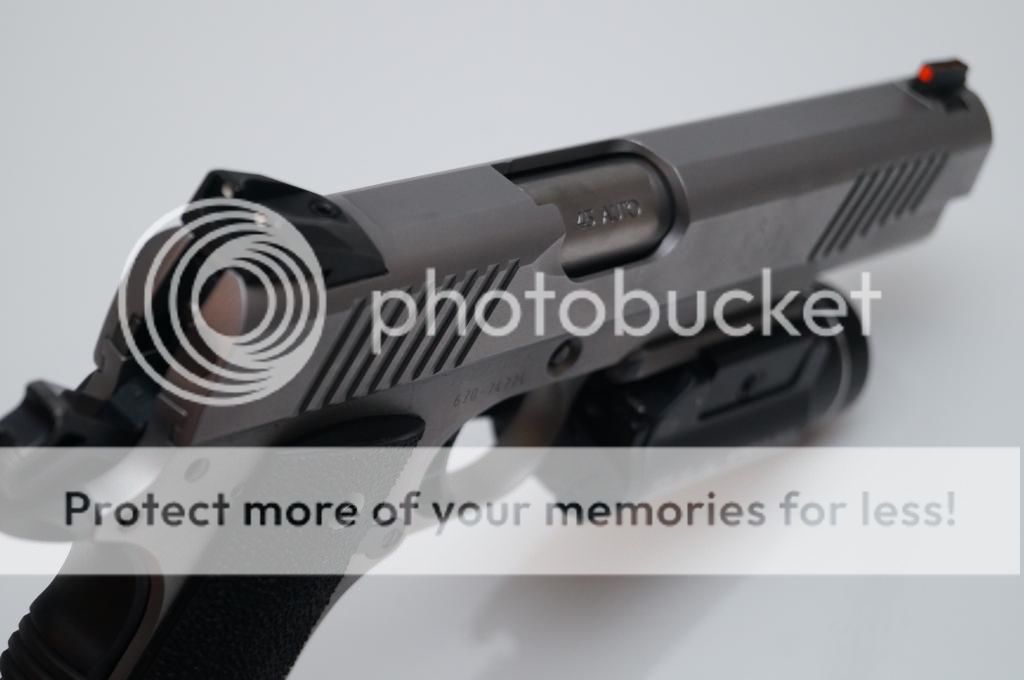
Flatted the top of the slide
Chamfered the base of the slide
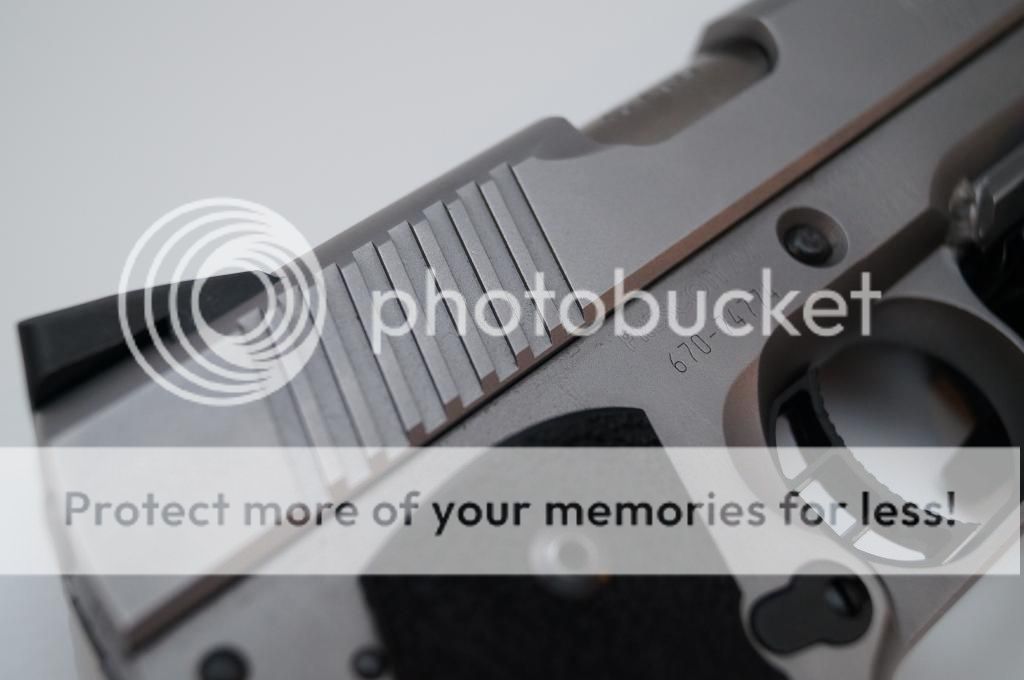
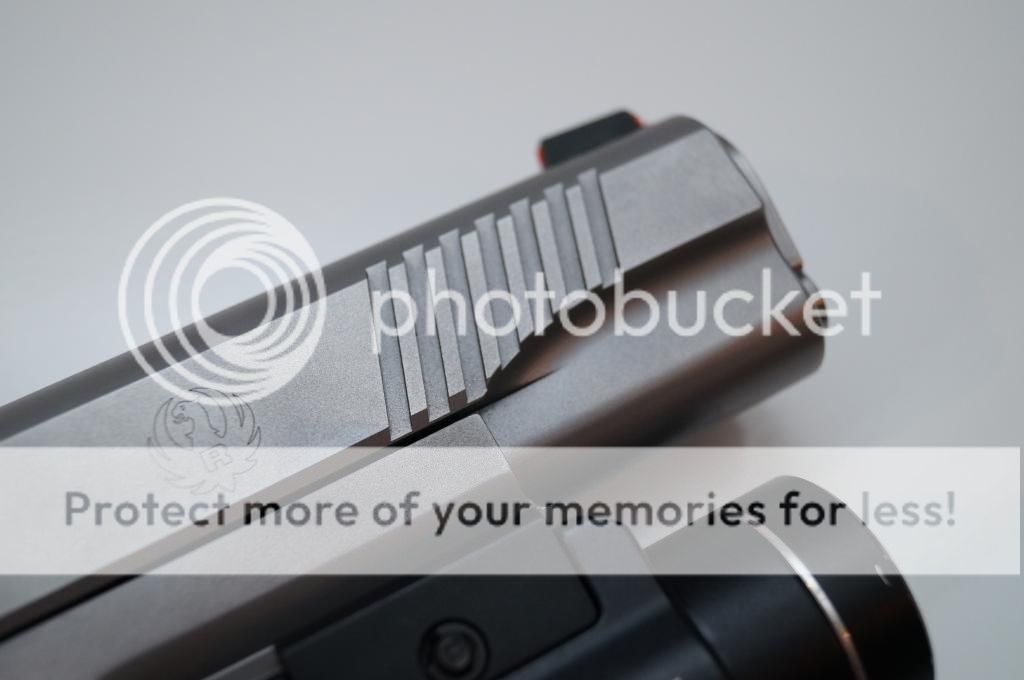
Front cocking serrations to match the factory rear serrations
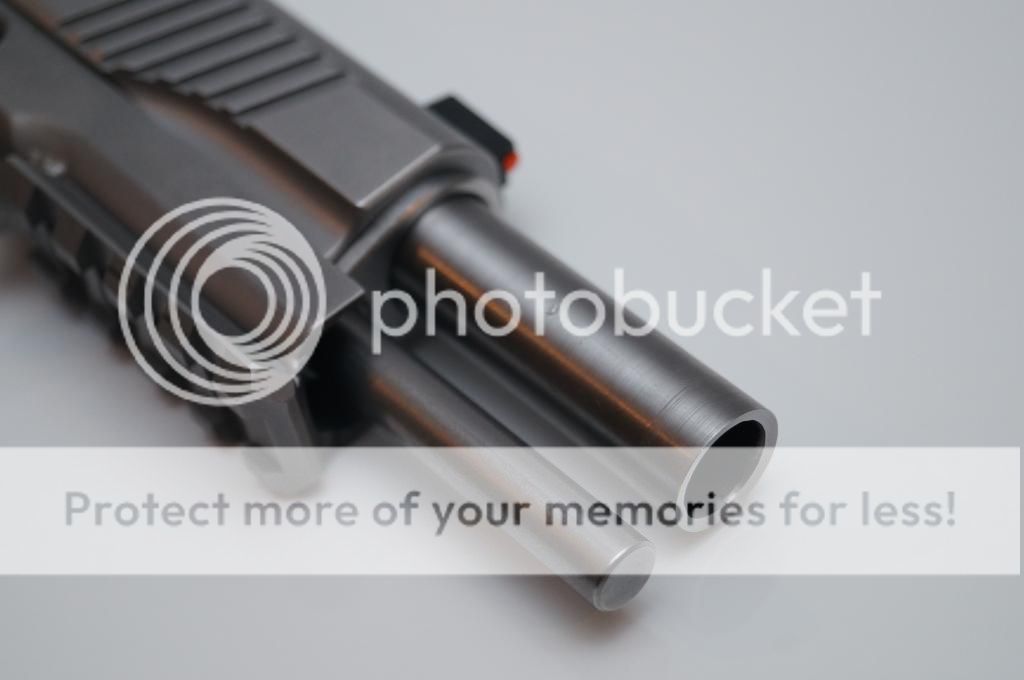
Flush Crowned barrel to bushing
Flushed / Beveled slide catch
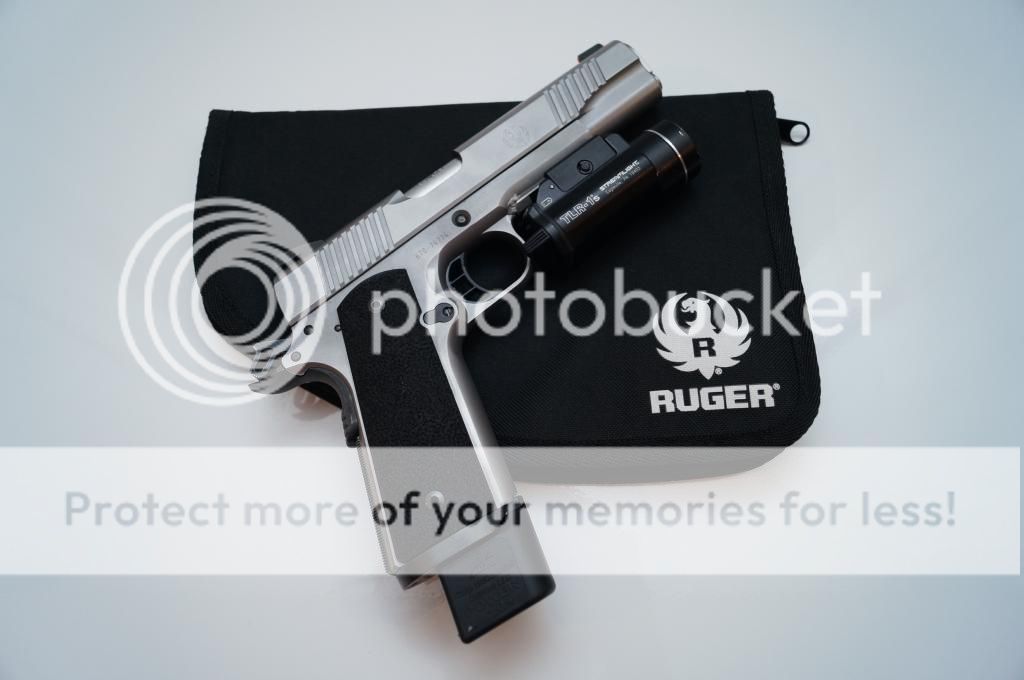
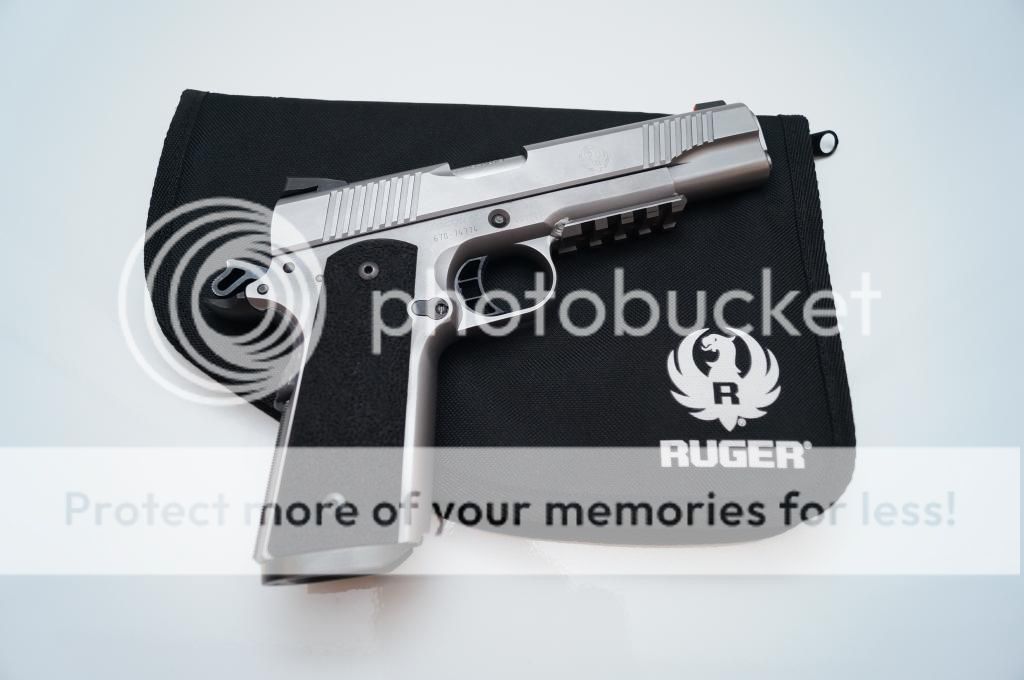
Machined out the dust cover and had an aircraft certified TIG welder weld in place a Novak rail
Used black oxide tool blackener to black out the sides of the hammer
Tuned trigger to 4 1/2 #'s

Installed the following

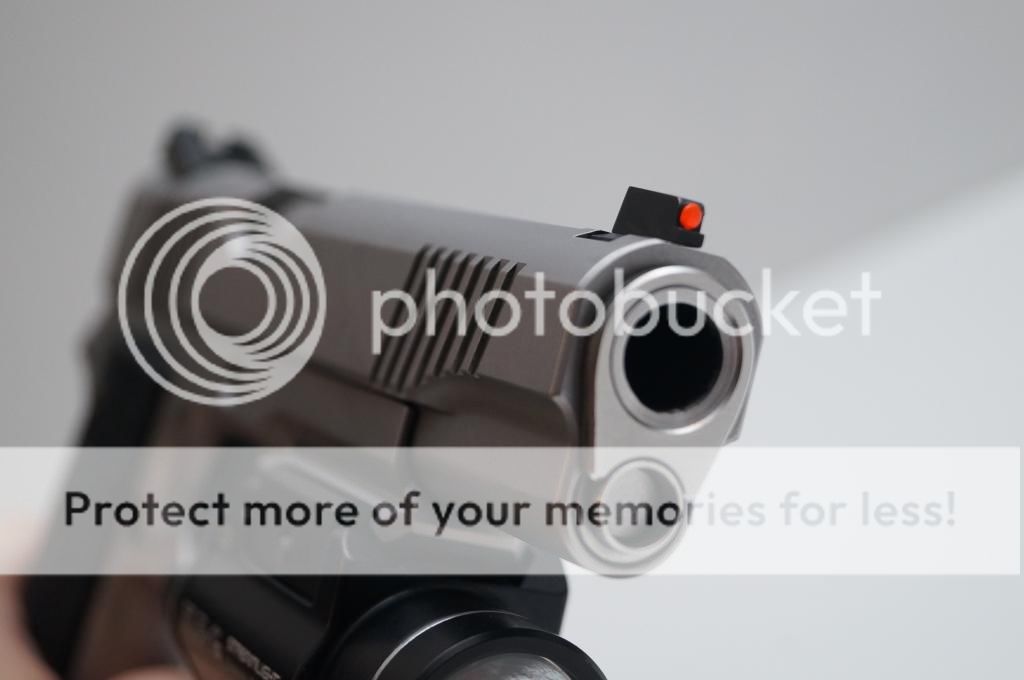
Novak fiber optic front sight
Wilson full length guide rod
STI Polymer trigger (Adjustable for pre travel can't recommend this part enough.)
Cheap black textured grips
Ed Brown drop in Maxi well

I didn't do any "reliability" modifications, as none seemed necessary and still don't. I've put better than 2K rounds through it since I finished it, scored several perfect scores at the clubs pin matches. Even made my own custom Kydex holster for it so that I could use it for some tactical shooting based gaming. Was super pleased how well the kydex came out, stuff really is easy to work with.

My sort of motivation was a fancy nighthawk custom tactical model a buddy showed me, I saw the picture, then the price tag, and went, WOAH . . . I could make something like that . . .

Finished the gun a little while ago, but a buddy recently took these nice pictures for me, credit for the pics to Will Belknap of Nonquitt Studios. Pictures came out so nice I had to share.
 
First things first: WOW!!! That thing looks GREAT!!! I just picked one up, and now I'm quite jealous of yours.

Regarding the grips: I just installed a pair of Hogue grips (rubberized, $20), and I'm quite pleased with them. They would certainly fit the "tactical" theme of the gun, if you're ever looking for a change of pace.

Regarding the guide rod: Full length versus original length...why either?

Finally...THAT LOOKS GREAT!!!
 
I'm actually pretty pleased with the 15$ textured grips, They provide an extremely no slip surface, ad where well, well within my budget. I plan on upgrading to some of those fancy grips with the relief for your finger to work the magazine catch (Or making my own maybe?)

The full length guide rod adds even more weight to the frame, I can shoot extremely rapid strings and easily maintain good accuracy, plus it looks "high speeed" and only cost about 20$. I beveled the rear of the guide rod myself to ensure proper clearance for the barrel. Also, I noticed the gun seems to lock up a little tighter since installing it.

I don't believe there is any reliability difference between the two.
 
A rail on a 1911, is like a fat broad wearing yoga pants. It's disgusting.

Otherwise looks kind of cool.

[video=youtube_share;PX2zU2g_oj0]http://youtu.be/PX2zU2g_oj0[/video]

Nice looking pistol. I have a rail gun built on a Remsport frame that looks just like this. [thumbsup]
 
A rail on a 1911, is like a fat broad wearing yoga pants. It's disgusting.

Otherwise looks kind of cool.

Must be why nearly every custom house and manufacturer of note makes one with a rail. Quick call Nighthawk and tell their marketing guys they've made a horrible mistake.

Kidding aside, I made a matching one for my friend who did the welding, he opted not to have the rail. As he wasn't planning on mounting a light.
 
It's a nice gun. I have an SR1911. I am just not a fan of a rail on a 1911. You did a very good job though.

I really wasn't being defensive, it was just funny because my welder whom I built the non railed version for literally said nearly the same thing.
 
Wow. I don't think this can be emphasized enough.

Great job.

Thanks guys.

I normally do programming / setup / operation of all varieties of CNC machines, my company manufactures parts for power producing gas turbines.

So honestly, I did the two guns in a couple two hour sessions on a Bridgeport. It was a lot of fun, I've got some other projects in the works too, including my SR1911 Commander that needs some special treatment.
 
Cool, but you may have a hell of a time finding a holster for your rail geometry. A few MM difference in where the rail is indexed seems to make a big difference when you're dealing with kydex.
 
Cool, but you may have a hell of a time finding a holster for your rail geometry. A few MM difference in where the rail is indexed seems to make a big difference when you're dealing with kydex.

Ben, I just rotated my vice on the table while running an indicator on the existing factory serrations, when they zero'd outa strapped it down and cut. Be sure to use a stop off the muzzle of a known distance so when you flip the slide over the serrations you cut on the opposite side can be places in an identical location.

Roland, soon to come pics of the custom kydex holster I made, along with a custom dual mag pouch. Kydex is super easy to work with. Also, if you had a factory kydex holster, it's very easy to spot heat it to change the fit a little.
 
Figured as much. I can't get away with do it at work lol. Not a fan of front serrations but I like to know how other tackle jobs etc .

Want to make me a custom bolt head and barrel extension lol... I'll pay lol.
 
Figured as much. I can't get away with do it at work lol. Not a fan of front serrations but I like to know how other tackle jobs etc .

Want to make me a custom bolt head and barrel extension lol... I'll pay lol.

If you mean for an AR, what could you possibly want that isn't available aftermarket already? LoL

What free time I have I try to spend working on my own projects, if I took other people's I wouldn't have the time for my own! Plus, there's something to be said for doing it yourself, it's rewarding.
 
BTW, you forget just how good a simple thing like the chamfer on the bottom of the slide looks until you see it done. Small detail that really sets the gun off.

Again, great job on this. I mean, really first class machine work.

Funny thing is, if Ruger made that gun, I might even buy a Ruger SR1911.

After putting it all together, I feel I could have gone a little heavier on the chamfer on the bottom.

I don't know that Ruger would ever make a gun just like that, but I could always make another . . . lol.
 
BTW, you forget just how good a simple thing like the chamfer on the bottom of the slide looks until you see it done. Small detail that really sets the gun off.

Again, great job on this. I mean, really first class machine work.

Funny thing is, if Ruger made that gun, I might even buy a Ruger SR1911.

The chamfer reduces bearing surface in the slide to frame fit. I am not sure that is a good idea.

PS What about the front strap?
 
The chamfer reduces bearing surface in the slide to frame fit. I am not sure that is a good idea.

PS What about the front strap?

No . . . it doesn't. I could have gone another .030 and still have an .020 flat hanging over the frame . . . Chamfers on the base of the slide are a common feature on high end 1911's. Also, by changing the angle of the tool I use to create the chamfer, I could bring the chamfer way up the side of the slide, while only reducing the amount of material at the base by a couple thousandths. As it is, I didn't use a 45 (90 Included) degree cutter to apply the chamfer I did. Not because I was concerned about the bearing surface, but because I didn't want to reduce the strength at the slide rails.

As far as the front strap, I didn't do anything to it yet because I wasn't really sure what I wanted. I'm thinking I'd like to do like a golf ball texture to it.
 
Last edited:
If you mean for an AR, what could you possibly want that isn't available aftermarket already? LoL

What free time I have I try to spend working on my own projects, if I took other people's I wouldn't have the time for my own! Plus, there's something to be said for doing it yourself, it's rewarding.

Nah , a maddi or Holmes style single shot bolt action. Shell holder style bolt . Ill just be sneaking it in when I can at work lol. Just the pos enco lathe at work sucks for cutting threads .
 
No . . . it doesn't. I could have gone another .030 and still have an .020 flat hanging over the frame . . . Chamfers on the base of the slide are a common feature on high end 1911's. Also, by changing the angle of the tool I use to create the chamfer, I could bring the chamfer way up the side of the slide, while only reducing the amount of material at the base by a couple thousandths. As it is, I didn't use a 45 (90 Included) degree cutter to apply the chamfer I did. Not because I was concerned about the bearing surface, but because I didn't want to reduce the strength at the slide rails.

As far as the front strap, I didn't do anything to it yet because I wasn't really sure what I wanted. I'm thinking I'd like to do like a golf ball texture to it.

Sorry, I forgot about the the fact that the slide extends quite a bit past the frame. allowing for a chamfer with no loss in bearing surface. My question was a sort of knee jerk reaction because the front strap s the first part of the frame that I work on. My compliments on your work.
 
Back
Top Bottom