So for my next little project I'm going to take the SA in the stock lock up thread and see what it can do with the know accuracy improvements with out the need of any special tools or gun smiths.
Everything I will do was found on the internet and forum discussions.
I am going to reassembly this rifle as it came from the cmp back in 2006. The only mod already done was the peening the gas cylinder spline on the barrel and replaced all the springs.
http://thecmp.org/training-tech/armorers-corner/gas-cylinder/
So I'm going to reassembly this rifle with the poor fitting stock, USGI trigger, loose lower band and then shoot a test target. I will be using HXP fresh from a tin. I will take 3 warm up shots then 16 shots on Targeting target at 100 yards prone using sling and sand bags for support.
Then I will retest after I "fix" all the loose ends and tighten things up.
1. Install new production CMP stock set.
2. Gauge and install the best gas cylinder and open rod I have on hand.
3. Trigger job and to be with in the 4.5# pull for the matches.
4. Fix the loose lower band.
I will detail what I do the best I can. I will up date as time allows.
AAMO
Rifle Mid 50s SA SG from cmp 5-55 barrel all parts that are marked are marked SA so it's at least SA correct.
What was done to the rifle when I received it.
Gas cylinder splines peened front cylinder had good amount of wobble. Replaced all the springs.
I buy the Orion7 spring kits for all my cmp rifles when I get them and replace them when I do the detail strip.
UPDATE #1
Books:
US 30 cal gas operated service rifles A shop Manual volume I,II by Jerry Kuhnhausen... more info than most of us will ever really need.
US War Department Weapons Overhaul manual 1965 us 30 cal rifle M1
Tools: USGI M10 tool/Cleaning kit.
Clymer Headspace gauges: Go and No go If it fails the No go the project stops there. I dont bother shooting rifle for score if it fails the NoGo. These are not expensive and can also be rented, borrowed or any decent gun shop should have some.
Muzzle wear and throat erosion gauge .....now to find mine? I have a commercial unit. I have not used it in many years though.
basic hand tools, hammers, punches, screw drivers, 1/4 drive
For your basic M1 needs a cleaning kit and M10 tool is all you really need.
UDATE #2 Bore condition
all but one of my garands has frosted barrels. I gave this barrel a good 50 brush strokes with gunzilla then a 10 min sweets 762 treatment. Came out pretty clean. Crown is in better condition than some. CMP hang tag has this at a Muzzle Erosion 3+ and Muzzle wear of 2. when I find my guage I will see what my gauge says. I have come to the conclusion that frosty bores shoot just fine.
I will heed a WARNING if you like how your barrel look peering down the bore with your eye and a bore light DO NOT BORE SCOPE IT!
UPDATE #3 Headspace check
using the M10 tool in the cleaning kit I disassembled the bolt and cleaned the chamber with the chamber brush in the GI cleaning kit. Using the Clymer go and no go gauges. I use Clymer as that's what I have for chamber reamers.
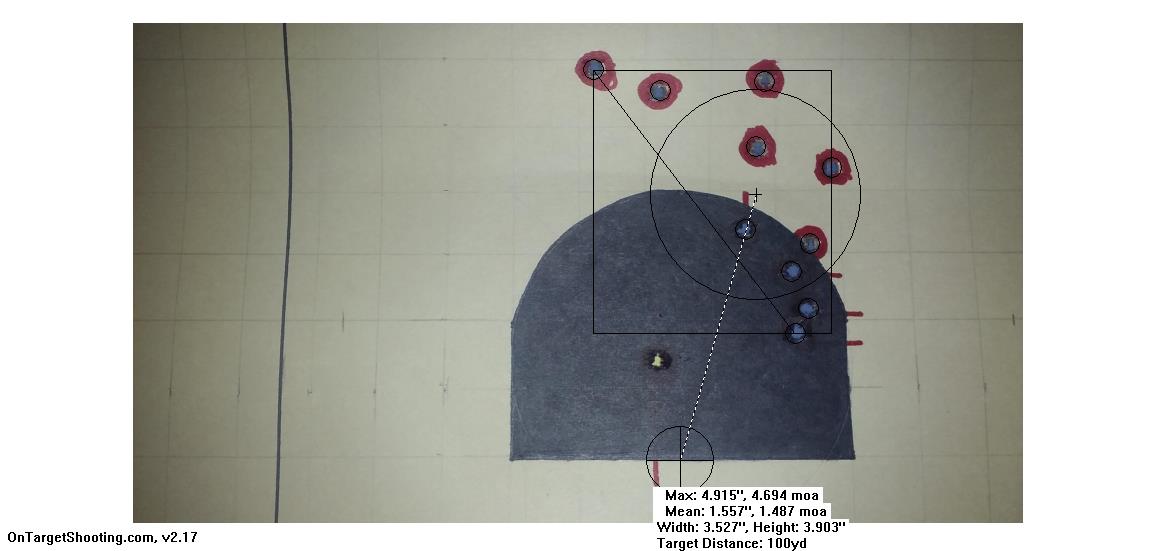
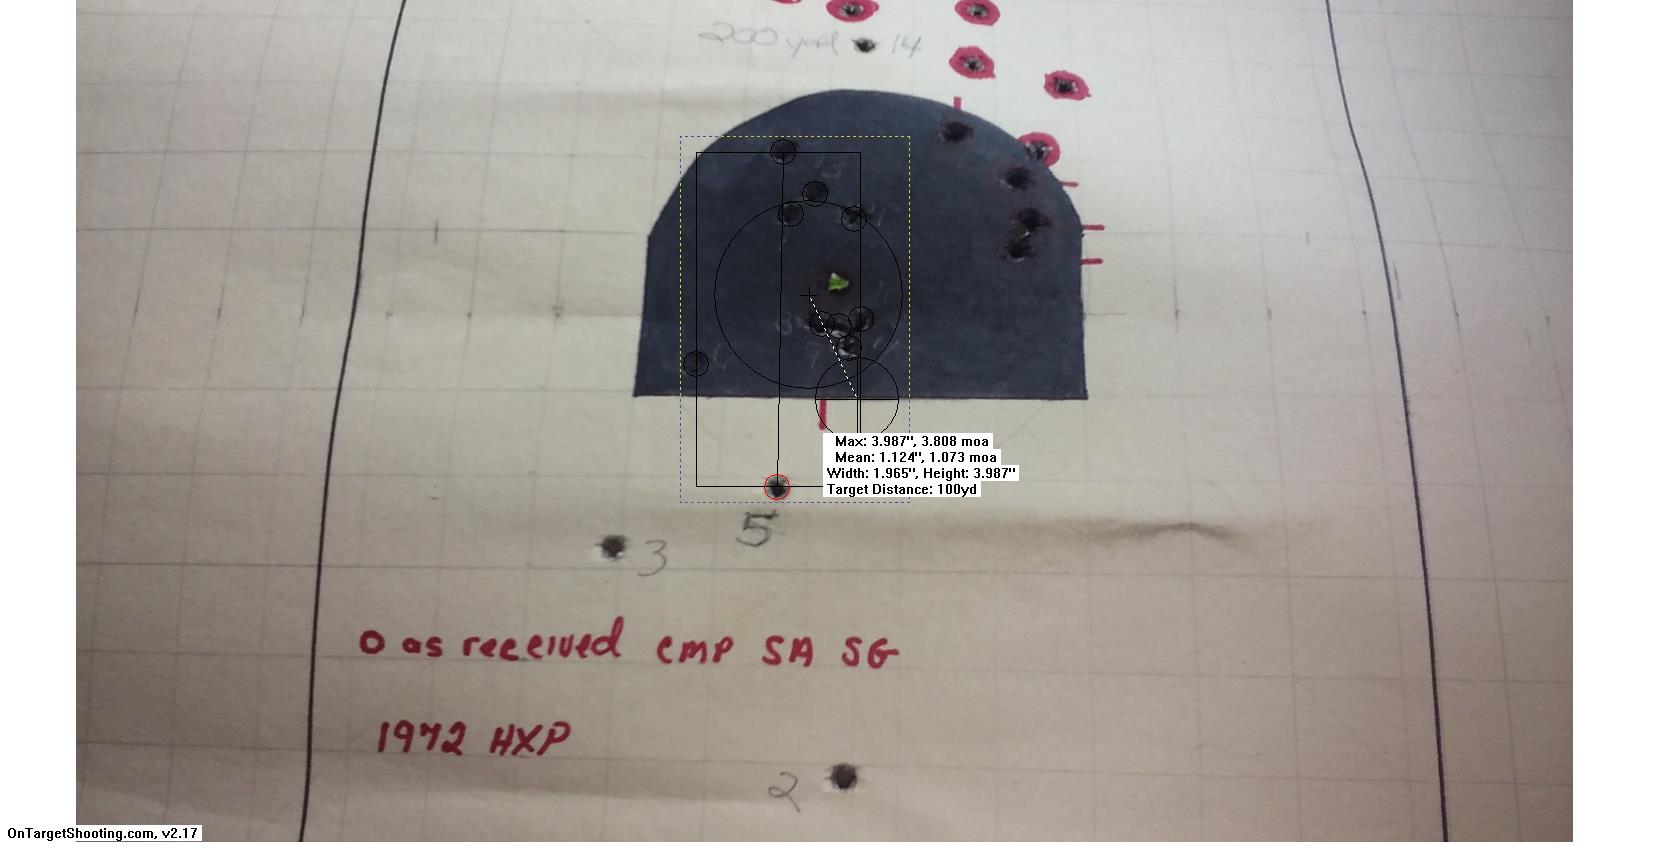
8/19 Update #4 Targeting and Accuracy test and target.:
So I decided to make up to the best of my skills the Targeting and Accuracy target used in the U.S. weapons Overhaul manual. This is not a "zeroing" target
The rifle is set up in a testing jig at the arsenals. I will be using sandbags to support my forward arm using a sling and shooting prone.
For testing the front and rear sight are centered for windage and the elevation is 8 clicks up from bottom. 3 warm up shots are fired before the 5 consecutive shots are fired on the target. I will be doing 3 warm ups and 10 for test shooting at about 1 min between shots.
The test allows +/- 2 clicks to correct shot group for elevation and drifting the front sight to correct windage.
I would guess that's why early M1s had a cap over the allen screw holding the the front sight on? Maybe a time when they tested every rifle.
I will be assembling the rifle today and hope to get out next week for the first test
Update #4: Accuracy and Targeting Test
100 yards
HXP 1977 M2 ball. loaded by enbloc
and it passed with 11 shots
NEXT UP: Do everything I can to improve on this with what I have on hand.
Stage 2 starts at post #17
Everything I will do was found on the internet and forum discussions.
I am going to reassembly this rifle as it came from the cmp back in 2006. The only mod already done was the peening the gas cylinder spline on the barrel and replaced all the springs.
http://thecmp.org/training-tech/armorers-corner/gas-cylinder/
So I'm going to reassembly this rifle with the poor fitting stock, USGI trigger, loose lower band and then shoot a test target. I will be using HXP fresh from a tin. I will take 3 warm up shots then 16 shots on Targeting target at 100 yards prone using sling and sand bags for support.
Then I will retest after I "fix" all the loose ends and tighten things up.
1. Install new production CMP stock set.
2. Gauge and install the best gas cylinder and open rod I have on hand.
3. Trigger job and to be with in the 4.5# pull for the matches.
4. Fix the loose lower band.
I will detail what I do the best I can. I will up date as time allows.
AAMO
Rifle Mid 50s SA SG from cmp 5-55 barrel all parts that are marked are marked SA so it's at least SA correct.
What was done to the rifle when I received it.
Gas cylinder splines peened front cylinder had good amount of wobble. Replaced all the springs.
I buy the Orion7 spring kits for all my cmp rifles when I get them and replace them when I do the detail strip.
UPDATE #1
Books:
US 30 cal gas operated service rifles A shop Manual volume I,II by Jerry Kuhnhausen... more info than most of us will ever really need.
US War Department Weapons Overhaul manual 1965 us 30 cal rifle M1
Tools: USGI M10 tool/Cleaning kit.
Clymer Headspace gauges: Go and No go If it fails the No go the project stops there. I dont bother shooting rifle for score if it fails the NoGo. These are not expensive and can also be rented, borrowed or any decent gun shop should have some.
Muzzle wear and throat erosion gauge .....now to find mine? I have a commercial unit. I have not used it in many years though.
basic hand tools, hammers, punches, screw drivers, 1/4 drive
For your basic M1 needs a cleaning kit and M10 tool is all you really need.
UDATE #2 Bore condition
all but one of my garands has frosted barrels. I gave this barrel a good 50 brush strokes with gunzilla then a 10 min sweets 762 treatment. Came out pretty clean. Crown is in better condition than some. CMP hang tag has this at a Muzzle Erosion 3+ and Muzzle wear of 2. when I find my guage I will see what my gauge says. I have come to the conclusion that frosty bores shoot just fine.
I will heed a WARNING if you like how your barrel look peering down the bore with your eye and a bore light DO NOT BORE SCOPE IT!
UPDATE #3 Headspace check
using the M10 tool in the cleaning kit I disassembled the bolt and cleaned the chamber with the chamber brush in the GI cleaning kit. Using the Clymer go and no go gauges. I use Clymer as that's what I have for chamber reamers.
8/19 Update #4 Targeting and Accuracy test and target.:
So I decided to make up to the best of my skills the Targeting and Accuracy target used in the U.S. weapons Overhaul manual. This is not a "zeroing" target
The rifle is set up in a testing jig at the arsenals. I will be using sandbags to support my forward arm using a sling and shooting prone.
For testing the front and rear sight are centered for windage and the elevation is 8 clicks up from bottom. 3 warm up shots are fired before the 5 consecutive shots are fired on the target. I will be doing 3 warm ups and 10 for test shooting at about 1 min between shots.
The test allows +/- 2 clicks to correct shot group for elevation and drifting the front sight to correct windage.
I would guess that's why early M1s had a cap over the allen screw holding the the front sight on? Maybe a time when they tested every rifle.
I will be assembling the rifle today and hope to get out next week for the first test
Update #4: Accuracy and Targeting Test
100 yards
HXP 1977 M2 ball. loaded by enbloc
and it passed with 11 shots
NEXT UP: Do everything I can to improve on this with what I have on hand.
Stage 2 starts at post #17
Last edited by a moderator:
![[popcorn]](/xen/styles/default/xenforo/smilies.vb/043.gif "Popcorn [popcorn]")
![[laugh]](/xen/styles/default/xenforo/smilies.vb/012.gif "Laugh [laugh]")