PervertYou need some legs in the front
-
If you enjoy the forum please consider supporting it by signing up for a NES Membership The benefits pay for the membership many times over.
You are using an out of date browser. It may not display this or other websites correctly.
You should upgrade or use an alternative browser.
You should upgrade or use an alternative browser.
need a workbench...
- Thread starter paul73
- Start date
PaulR
NES Member
Nice Job Steve.
Brick sh!thouse.
Only thing I did/would have done different with mine is leave open spaces with not shelves underneath to sit at the bench, or slide bigger things underneath.
not sure if I still have pics of my build 12 years ago.....
edit:
mind you I'm an accountant and not a carpenter. I built in these metal drawers I picked up cheap at a local place that was going out.
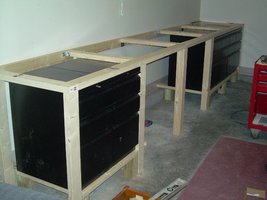

Last edited:
steve8140
NES Member
Thank you,Nice Job Steve.
Brick sh!thouse.
Only thing I did/would have done different with mine is leave open spaces with not shelves underneath to sit at the bench, or slide bigger things underneath.
not sure if I still have pics of my build 12 years ago.....
I’m not a carpenter either, I just enjoy building things for myself. I can sit perfectly in this case. My legs and feet don’t hit anything underneath since the shelf is recessed.
No need for larger items, that’s what the rest of the basement is for.
bfm
NES Member
Where do you shop that is cheaper? They do not have the best price for everything, but some of their volume pricing beats most of the other places I have found. Mostly when I need something like 50-200 containers of one kind or another.Everytime I come across Uline website I wonder who buys their stuff as its always more expensive. We get a catalog at work a few times a year for stuff like floor mats , disposal covers, stuff like that . Boss looks at it laughs and tosses it in the trash
I also bought my wire rack shelving from them recently, but they were the only ones who had 24"x48" 300 lb per shelf rating in stock.
steve8140
NES Member
cathouse01
NES Member
- Joined
- May 10, 2018
- Messages
- 2,441
- Likes
- 4,668
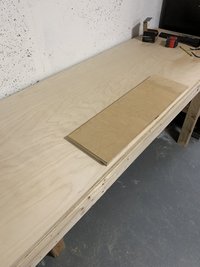
You might want to try 100% Tung Oil instead. That will definitely be darker. Just keep it down to a couple of coats or it will get too dark.The bench top is currently natural but this small piece has two coats of teak oil I had laying around.
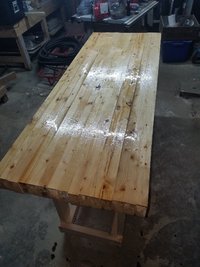
What’s everyone think? Personally I thing in needs to be a little darker.
View attachment 547125
I have actually used one of the recommended refinishing techniques for M1 Garands on furniture (particularly table tops) to good effect. Start with a light coat of sanding sealer to make sure the finish is even, then a coat of Minwax Natural 209 stain to bring out the grain, then two coats of 50% Tung Oil/50% Mineral Spirts. Then as many coats of Tung Oil as you want to get the color you're after. (Wait 24 hours between coats.). Of course after all that work it will look too nice to use as a work bench.
For a work bench I think you could get away with just a couple of coats of Tung Oil.
Here’s what an M1 looks like after following the process using 7 coats of 100% Tung Oil.

My standard warning: when using Tung oil, IMMEDIATELY burn outside any rags you used. Tung Oil is the #1 source for spontaneous combustion.You might want to try 100% Tung Oil instead. That will definitely be darker. Just keep it down to a couple of coats or it will get too dark.
I have actually used one of the recommended refinishing techniques for M1 Garands on furniture (particularly table tops) to good effect. Start with a light coat of sanding sealer to make sure the finish is even, then a coat of Minwax Natural 209 stain to bring out the grain, then two coats of 50% Tung Oil/50% Mineral Spirts. Then as many coats of Tung Oil as you want to get the color you're after. (Wait 24 hours between coats.). Of course after all that work it will look too nice to use as a work bench.
For a work bench I think you could get away with just a couple of coats of Tung Oil.
Here’s what an M1 looks like after following the process using 7 coats of 100% Tung Oil.
View attachment 547155
Mesatchornug
NES Member
Or, lay flat to dry (under observation)My standard warning: when using Tung oil, IMMEDIATELY burn outside any rags you used. Tung Oil is the #1 source for spontaneous combustion.
Or, dispose in a metal trash can with a tight fitting lid.
Same with linseed oil
- Joined
- Dec 2, 2016
- Messages
- 3,745
- Likes
- 10,171
I recently refinished a kitchen table with that. I was very impressed with the results. You have to be patient with the cure time. They say the main reason people have issues is when they try to cut corners. I let mine dry for a week between coats.
bfm
NES Member
Probably overkill for this application.I recently refinished a kitchen table with that. I was very impressed with the results. You have to be patient with the cure time. They say the main reason people have issues is when they try to cut corners. I let mine dry for a week between coats.
For my next bench, I am thinking of using this. Tried & True Wood Finish - Oil Tried and True Original Quart
DarthRevan
NES Member
For those that are or have built benches in their garage:
Do you secure it to the wall, through the fire rated drywall, or do you only anchor through the floor?
Do you secure it to the wall, through the fire rated drywall, or do you only anchor through the floor?
namedpipes
NES Member
The pattern I used for my workbench:
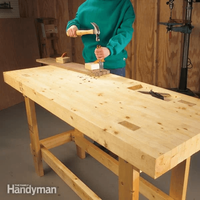
And the "nearly" finished product:
I'd planned to shave the ends of the butcherblock to be even/smooth but a move and life got in the way and now it doesn't bother me![Laugh [laugh] [laugh]](/xen/styles/default/xenforo/smilies.vb/012.gif)
I modified the plans so the legs don't come through the top but fit into notches on the bottom of the tabletop.
When I organize my shop over the winter, I'll add a plywood shelf to that lower section. It gained a vise since the pic was taken.
Since then, I discovered the butcherblock "countertops" from the big box stores and these make great benchtops with a LOT less work and smoother finish.

And the "nearly" finished product:

I'd planned to shave the ends of the butcherblock to be even/smooth but a move and life got in the way and now it doesn't bother me
![Laugh [laugh] [laugh]](/xen/styles/default/xenforo/smilies.vb/012.gif)
I modified the plans so the legs don't come through the top but fit into notches on the bottom of the tabletop.
When I organize my shop over the winter, I'll add a plywood shelf to that lower section. It gained a vise since the pic was taken.
Since then, I discovered the butcherblock "countertops" from the big box stores and these make great benchtops with a LOT less work and smoother finish.
Last edited:
Did you take out a mortgage to buy that wood or are you loaded?Come on guys, keep this alive.
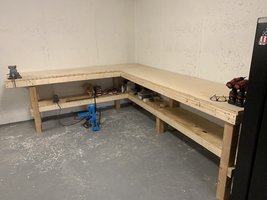
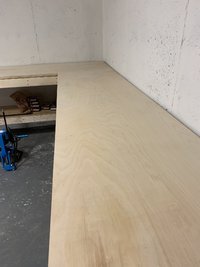
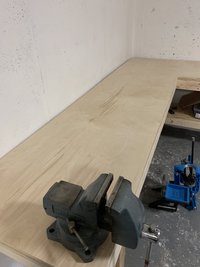
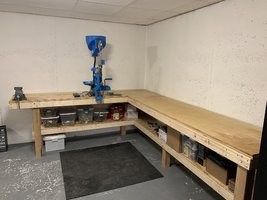
Got the top cut last week and mounted it tonight. Glued and screwed from underneath.
Now I need to choose how to finish it. I’ll sand it down and clean up the edges. Then I’ll bolt down the vise and XL650 and be up and running again.View attachment 547108View attachment 547109View attachment 547110
If loaded, a/s/l?
![Wink [wink] [wink]](/xen/styles/default/xenforo/smilies.vb/002.gif)
Looking great.
That looks great.Nice Job Steve.
Brick sh!thouse.
Only thing I did/would have done different with mine is leave open spaces with not shelves underneath to sit at the bench, or slide bigger things underneath.
not sure if I still have pics of my build 12 years ago.....
edit:
mind you I'm an accountant and not a carpenter. I built in these metal drawers I picked up cheap at a local place that was going out.
View attachment 543934
PaulR
NES Member
I used Spar Urethane on mine. Didn't know what to use and that stuff "sounded" tough.
It seems to work fine.
However I used Minwax Spar Urethane in the green can on some pine adirondack chairs this Spring, by fall they were totally wasted, not happy with this product for outdoor use at all.
Off on a tangent here but so far I've found Messmers UV Plus to be the best for outdoor wood protection. My 2 year old trailer deck and Cedar BBQ shed look good as new.
bfm
NES Member
Nice. The ends are close enough to not be an issue unless you work from the ends.The pattern I used for my workbench:
I'd planned to shave the ends of the butcherblock to be even/smooth but a move and life got in the way and now it doesn't bother me
I modified the plans so the legs don't come through the top but fit into notches on the bottom of the tabletop.
When I organize my shop over the winter, I'll add a plywood shelf to that lower section. It gained a vise since the pic was taken.
Since then, I discovered the butcherblock "countertops" from the big box stores and these make great benchtops with a LOT less work and smoother finish.
Not doing a through mortise for the legs is not a bad idea. Easier to keep the top flat and looks cleaner.
Counter tops from big box stores can work, but hard to find one that thick for a reasonable price and putting two together for thickness can be harder than it looks.
I might have sistered another 2x4 to each leg stopping them so they are supporting the underside of the tabletop and are flush with the edge.
namedpipes
NES Member
Nice. The ends are close enough to not be an issue unless you work from the ends.
Not doing a through mortise for the legs is not a bad idea. Easier to keep the top flat and looks cleaner.
Counter tops from big box stores can work, but hard to find one that thick for a reasonable price and putting two together for thickness can be harder than it looks.
I might have sistered another 2x4 to each leg stopping them so they are supporting the underside of the tabletop and are flush with the edge.
The legs and rims are 2x6, but perhaps I'll do that for OCD sake.
I did a desk using one of those countertops (black iron pipe and fittings for the base/legs), haven't tried a workbench. Perhaps the countertop bolted down onto 1/2" plywood.
The bench would have come out better if I had a planer, but it's good enough for the rough sort of work it sees. Can't recall what poly I used but it still looks good. You know, for a NON professional woodworker. Few cabinetmakers are concerned that I'll edge them out of a job.
bfm
NES Member
Ah, could not tell from the pic that they were 2x6.The legs and rims are 2x6, but perhaps I'll do that for OCD sake.
I did a desk using one of those countertops (black iron pipe and fittings for the base/legs), haven't tried a workbench. Perhaps the countertop bolted down onto 1/2" plywood.
The bench would have come out better if I had a planer, but it's good enough for the rough sort of work it sees. Can't recall what poly I used but it still looks good. You know, for a NON professional woodworker. Few cabinetmakers are concerned that I'll edge them out of a job.
steve8140
NES Member
I sell my wife on the street corners to pay for my lifestyle.Did you take out a mortgage to buy that wood or are you loaded?
If loaded, a/s/l?
Looking great.
It’s my way of charging her to benefit from my handyman abilities.
Someone give this man a beer and a free NES Life Membership.I sell my wife on the street corners to pay for my lifestyle.
It’s my way of charging her to benefit from my handyman abilities.
bfm
NES Member
Why? He can obviously afford his own.Someone give this man a beer and a free NES Life Membership.
steve8140
NES Member
Here’s how she benefits, she goes back to work in January after being on maternity leave. She wants to clean up her home office.
We’ve been in this house for about 6 months and we haven’t painted this room yet, so now it needs to be done.
She showed me a picture online on Saturday night. I had no intentions of doing this but Sunday morning I got the material and spent 3 hours doing this.
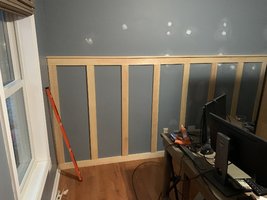
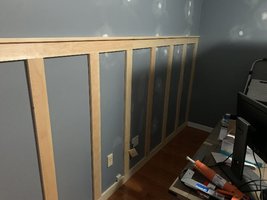
We’ve been in this house for about 6 months and we haven’t painted this room yet, so now it needs to be done.
She showed me a picture online on Saturday night. I had no intentions of doing this but Sunday morning I got the material and spent 3 hours doing this.


Last edited:
bfm
NES Member
nice.Here’s how she benefits, she goes back to work in January after being on maternity leave. She wants to clean up her home office.
We’ve been in this house for about 6 months and we haven’t painted this room yet, so now it needs to be done.
She showed me a picture online on Saturday night. I had no intentions of doing this but Sunday morning I got the material and spent 3 hours doing this.
View attachment 547360
View attachment 547361
Is that your 4 foot Johnson in the corner?
Those look good
Share:

